Lash mapping is worth using, regardless of whether you are a beginner lash artist or one with many years of experience in this field. Eyelash mapping was invented to ensure the process of applying eyelash extensions is easier and significantly shorter. How to perform lash mapping well? Is it really that useful? Is it worth using ready-made lash maps or creating your own? Find out today!
Eyelash mapping - what exactly is it?
An eyelash map is, in the simplest terms, a diagram of eyelash extensions, which indicates which lashes to choose and apply on a given segment of natural lashes. Such a map is intended to make it easier for the lash stylist to create specific lash looks, and also maintain the symmetry of the client's eyes. In addition, eyelash mapping can help reduce the procedure work time. It takes less than a minute and translates into the entire service. You don't have to waste precious moments thinking about the next steps of your treatment and reach directly for what the eyelash map indicates.
Eyelash mapping - who is it for?
Eyelash mapping will be useful for both new and advanced lash stylists. It will certainly be a good choice for beginners as they get to learn to create specific lash styles and absorb all the information better, especially in terms of thickness, length, and curl and their chosen lash extension methods.
Advanced lash artists can also confidently use it to make their job easier and faster. There is absolutely nothing wrong with this as lash mapping can significantly increase productivity. That's why it's a good idea to learn eyelash mapping and start using it.
How to perform eyelash mapping?
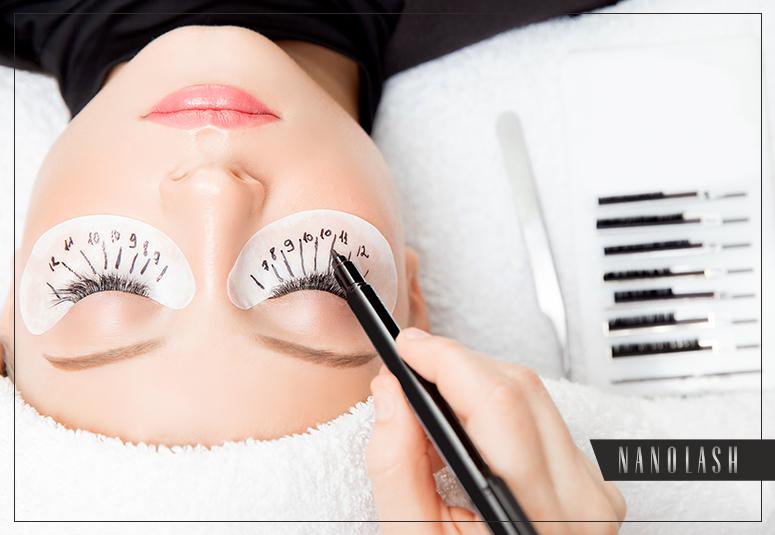
The whole process is quite easy. When prepping your client for eyelash extensions, you always need to remember one of the most important steps - to separate the lower eyelashes from the upper ones, so that they do not interfere with the false lash application. You can do it using special pads (usually hydrogel or made of special lint-free material). Place them on the lower eyelid, separating the lower eyelashes, and start applying your extensions. If you decide to create an eyelash map, this is the right moment.
Reach for a pen or a thin marker and draw dots on the pad indicating what length of false eyelashes you want to use. Draw long lines, which are extensions of the natural lashes. In this way, we divide the lashes into segments, marking them with numbers corresponding to the lash lengths. This is how we know which lashes to reach for during the extension procedure. That's it! Eyelash mapping is not demanding or time-consuming and can be incredibly helpful.
What should you pay attention to when creating your eyelash map?
Remember that practice makes perfect. Lash mapping is not difficult and with time, every lash stylist develops her own method, but for it to be correct, it is worth paying attention to a few important factors:
- Measure the length of both eyes properly. Remember that both eyes are not always the same, so to maintain the symmetry of the lashes, you need to keep this in mind.
- Also, remember to create a lash map when your client is sitting or standing. When she's lying down, her body is affected by gravity, causing the eyelid to align differently.
- You can also mark the map on the eyelid using small dots. It's worth doing this, because while applying false eyelashes, you often stretch the eyelid, changing its shape. The dots give you more control over the process.
TIP: When choosing a pen for creating your eyelash map, opt for a color different than black. It can be green or pink. This will make your eyes tire a lot less because the lash color and the color of the map will contrast with each other.
Ready-made eyelash maps - is it worth using them?
Ready-made eyelash maps come as stickers that you can stick on a hydrogel pad. They ensure great convenience and, of course, you can use them, but it is not always the best choice. There are two reasons.
- By using ready-made patches, you will not develop your own method. The patches are divided into different lash styles, but professionals believe that it's a better option to gain practice in this field. In addition, the client will definitely appreciate your individual approach and attention.
- They can do more harm than good. A reminder: every person's eyes are completely different, and the right and left eye are not always symmetrical. Using the same stencil on the left and right eye can create an asymmetrical look. Therefore, it would be best for the lash stylist to analyze the eye shapes and draw the lash map herself to create a beautiful and symmetrical lash look.
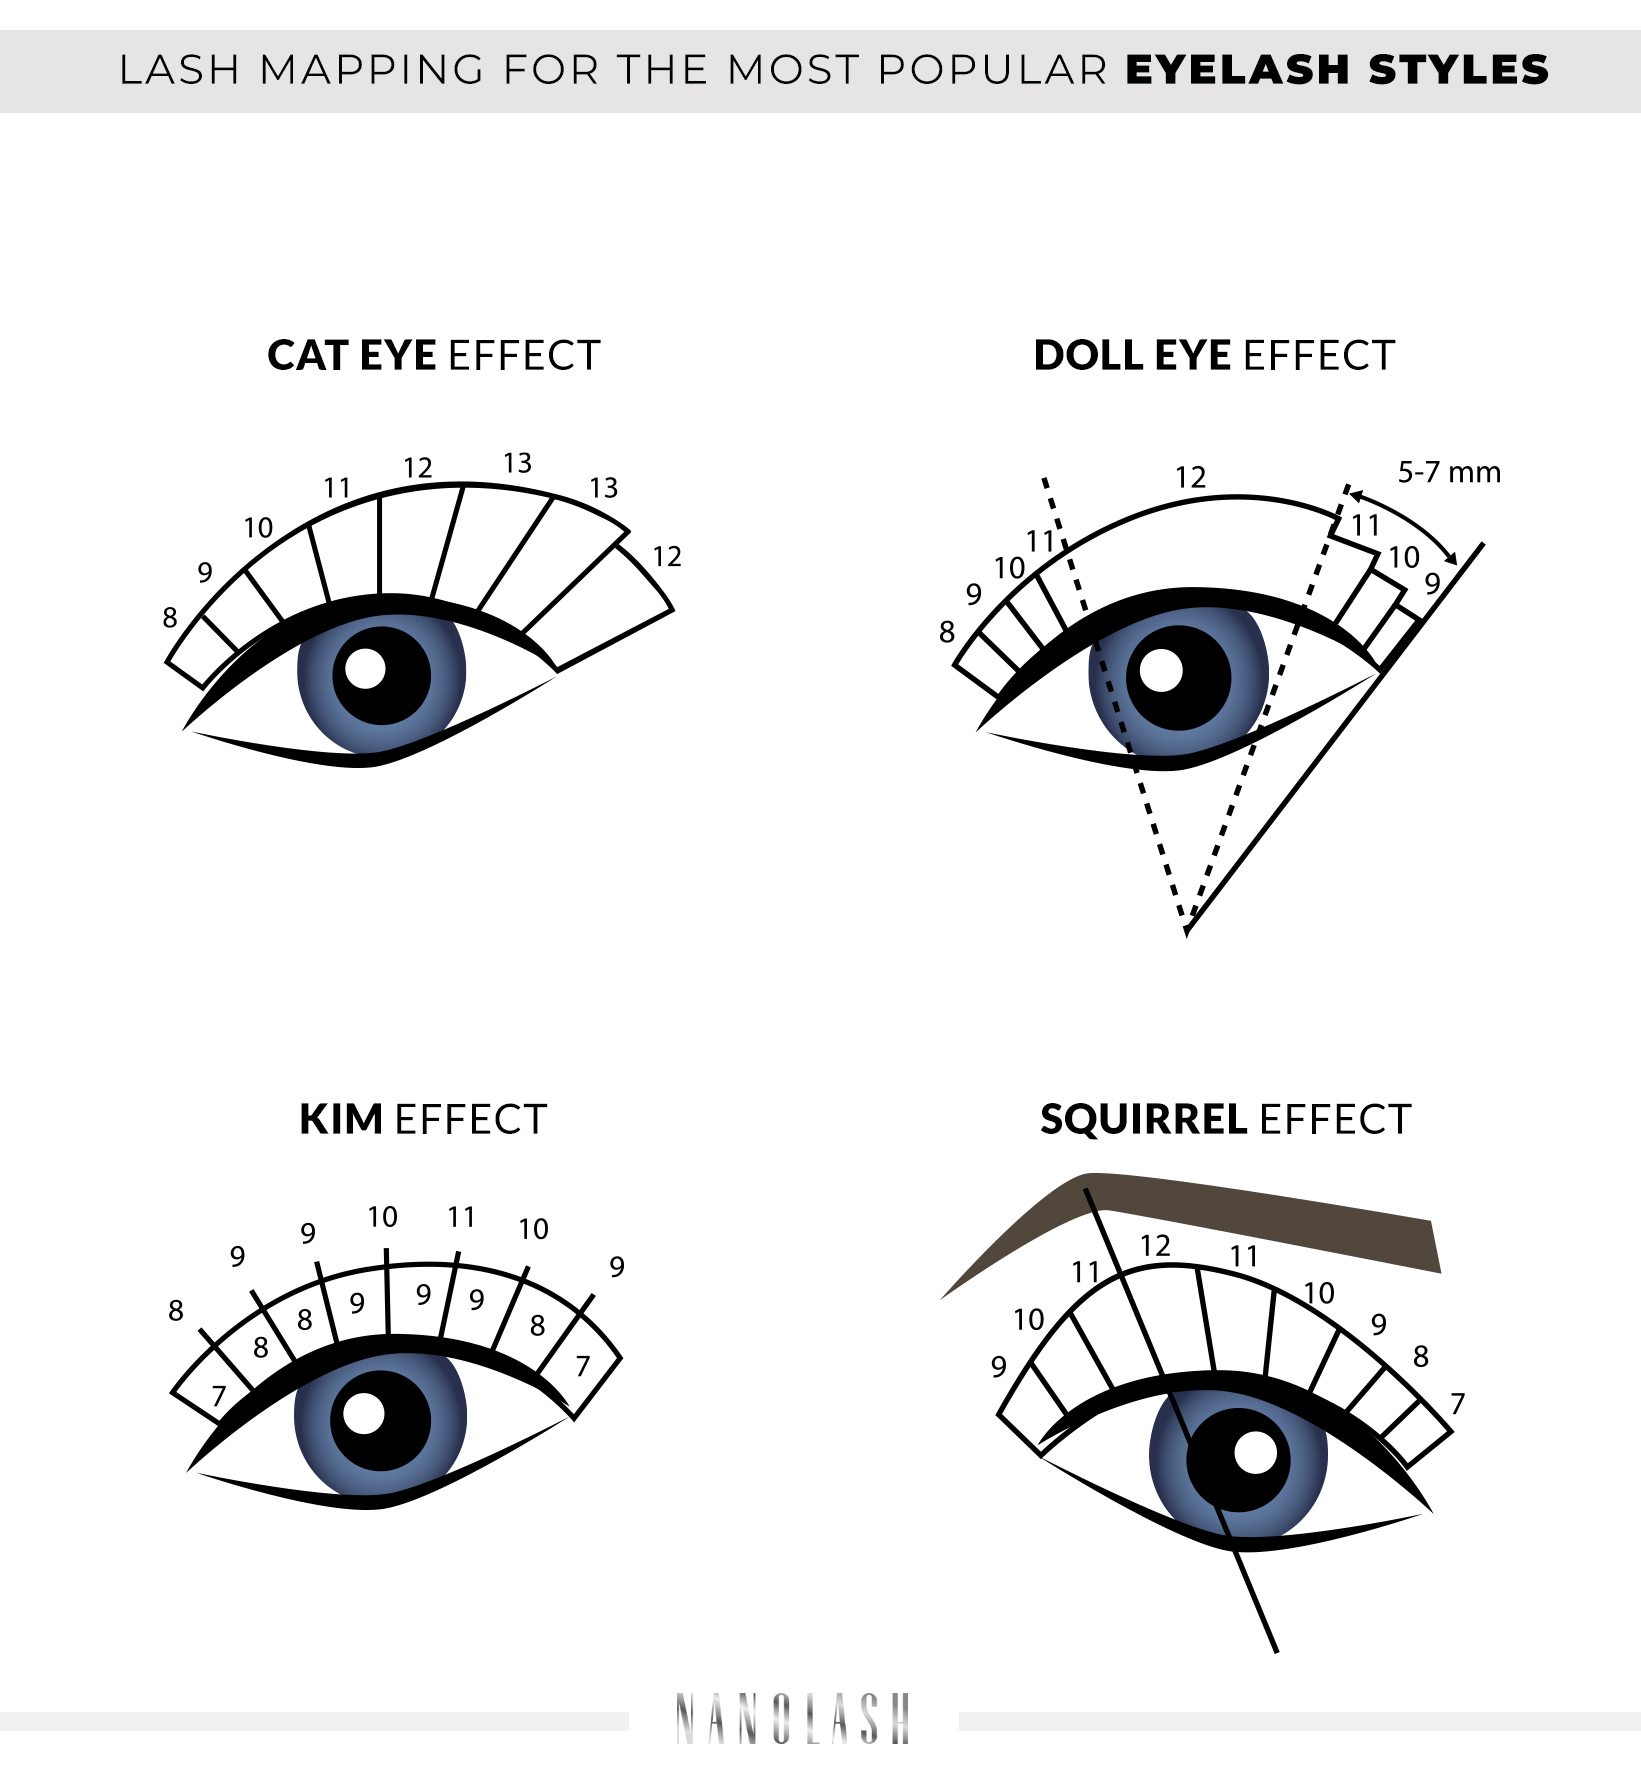
Lash mapping for - most popular lash styles
- Doll eye effect: Use the longest lashes in the center of the eye. The doll eye effect is designed to make the eye seem rounder and open it up more visually. This effect is ideal for owners of almond-shaped eyes or widely-spaced eyes.
- Cat eye effect: This effect is most often used to make the eye look longer. Gradually increase the length of the lashes from the inner to the outer eye corner. However, remember to use shorter lashes (by 1 or 2 mm) at the very edge of the outer corner. The natural lashes are shorter and sometimes slightly weaker in this area which can cause the lashes to fall out faster or droop downward, spoiling the finished look. This style is often considered quite universal, but it works best for close-set or round eyes.
- Squirrel eye effect: You may associate this effect with a mountain shape. It involves gradually increasing the length of the eyelashes from the inner eye corner until you reach the highest point of the arch, then gradually decreasing the length of the eyelashes. The squirrel eye effect is aimed at lifting the outer corner of the eye, so it is suitable for owners of almond-shaped or close-set eyes with droopy eyelids.
- Kim effect: One of the most popular and desirable eyelash extension effects. As you can see in the photo, in addition to the standard lash volume, each successive segment is enhanced with longer lashes, creating spectacular rays. This is another universal effect, but it's best for almond-shaped and round eyes.